
3.1. Drawing tools
Ruler
We use a ruler to measure distances, it is usually graduated in centimetres and millimetres.
|
 |
Protractor
We use a protractor to measure angles, you must place the vertex of the angle at the center mark of the protractor.
|
 |
Pencil
Pencils have leads of different hardness in a scale that range from soft (B) to hard (H)
Sofest4B,3B,2B,B,F,HB,2H,3H Hardest
If the lead is soft the lines will be dark and thick
To obtain dark thin lines it is necessary to use soft lead and to sharpen the pencil very often.
|  |
Rubber
Rubbers are used to erase what has been drawn with a pencil.
They also can be softer or harder.
Softer rubbers normally erase better but they also wear down faster.
|
 |
Compass
The compass is used to draw arcs or circles.
One arm of the compass has a needle. The other arm has a lead or a pencil.
|
 |
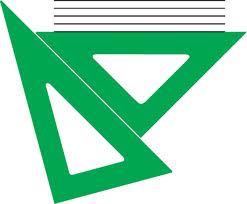
Square and bevel
We use the square and bevel for drawing parallel and perpendicular lines and angles
|
 |
CAD
(Computer Aided Design)
These computer programs are used to make technical drawings for architects and engineers
|
 |
3.2 Basic Drawing Techniques
Making parallel lines with a square and a ruler
You will need two squares or a ruler and a square:

Making perpendicular lines with a square and a ruler
You will need two squares or a ruler and a square:

Notice that the squares have some angles that you can use to draw angles on your paper.

You can draw directly the 90º, 45º, 60º and 30º angles, you only have to draw two lines, one on each side of the angle corner.
You can also combine different corners of the different squares to obtain angles which are the sum of the two corners.
3.3.- Activities
Activity 1 : Visit the following web page:
Look at the drawing equipment and do the first set of exercises.
Activity 2: Using two square and bevel, draw parallel lines.
Activity 3: Using square and bevel, draw perpendicular lines.
Activity 4: Using square and bevel, draw the following angles.
60º 55º 120º 135º
Activity 5: Go to http://www.mathopenref.com/constangle60.html
Watch the animations on how to draw a 60º angle (pressing next or run Then, using a compass and a ruler, draw a 60º angle on paper.
Draw the construction lines thin and draw the segments that form the angle lines thick.
Activity 6. On the same page (http://www.mathopenref.com/constangle6o.html)
watch the animations on how to draw 45º and 30º angles and then draw them on paper.